How I install Arch Linux in 2021
A little background Link to heading
My journey with Linux I think is a common one. For ten years, my installation has evolved across 3 machines, 3 distros, and 4 hard drives. But this road isn’t easy, as most users know. I grew tired of jumping between eight different ways to do any given thing, where each option is only 80% implemented. On top of that, all options seem either ignorant of one another, or at war with one another.
This led me to adopt a Macbook as my primary machine around 2019, with a hope that maybe this is “Unix on the desktop, done right”. But now I’m running into more and more issues with their walled garden. To name a few, macOS lacks thread affinity support, gdb support, and full support for valgrind/helgrind.
So do I choose something that “just works”, but doesn’t let me do that 10% of things I want to do? Or do I choose something that’s going to break 10% of the time, but will always let me do the things that I want to do?
This dilemma has caused many users to swing back and forth between Macbooks and Linux, and I think my latest pendulum swing has gotten me fed up with the proprietary system that’s making macOS harder and harder to use.
Maybe there’s a third option where I can keep either OS available. Instead of fully swinging back to my old “everything in my life is Linux” ways, can I reach for my Linux box when working on an OS project, while still having my Macbook handy for music production and running proprietary software? I don’t know, but I’ll be exploring this approach in 2021. In fact, I’ve already updated my dotfiles repository to work across both operating systems!
While the rest of this post documents my latest Arch Linux installation, I’ve found some peace for now in accepting that it won’t be perfect. Operating systems, hardware, and their ecosystems will continue to evolve, and we’ll need to adapt if we want to keep up. Also, there is hope, with promising projects like Asahi Linux aiming to deliver a polished Linux experience. I’m hoping that one day this will be a problem of the past that we’ll look back on with wistful smiles.
But until then, it’s becoming clear that the only constant we can optimize for is change. So let’s get to it!
What we will cover Link to heading
2023 Update: I highly recommend using logical volumes and full disk encryption, which are not covered in this post. I’m currently doing this with LVM on top of LUKS. See references below for some excellent guides on how to do this!
I find myself performing an installation every few years as I haul my data across various machines and devices. Luckily Arch makes this very simple, as long as we stay committed to understanding the Linux ecosystem.
This post is intended for anyone (especially my future self) who wants to do the following:
- Installing Arch Linux on a Thinkpad Carbon X1 (I have a gen 3, but other generations should be very similar)
- Booting with UEFI using the
systemd-bootbootloader, and configuring the bootloader - Setting up a disk with GPT partition (migrating from MBR if needed)
- Documenting BIOS settings that make this all possible
I’ll be documenting all of the steps of my basic installation, but I won’t be elaborating too much on any given step. The Arch Linux installation guide is a great reference for further clarification.
Pre-Requisites Link to heading
I’m assuming that we already have the following:
- an installation image to boot into a live environmnent
- a backup of your data in case anything goes wrong
Checking our hardware Link to heading
I recommend reading the Arch docs for the ThinkPad X1 Carbon.
While it mentions that the Legacy BIOS route is easier than UEFI, I’ve found that using the systemd-boot bootloader over UEFI to be simpler and more forward-thinking than Legacy GRUB (or other MBR bootloaders). GRUB can be especially difficult to configure correctly when things go wrong.
And here’s docs on the X1 Carbon gen 3
I wasn’t able to confirm the generation from the CLI, but another way to check the device’s version is by checking at model number sticker on the bottom of the laptop. On gen 3, it starts with 20BS or 20BT:
BIOS settings Link to heading
There are 2 settings that we’ll have to ensure are correctly configured in our BIOS:
- The BIOS is set to boot in UEFI mode only
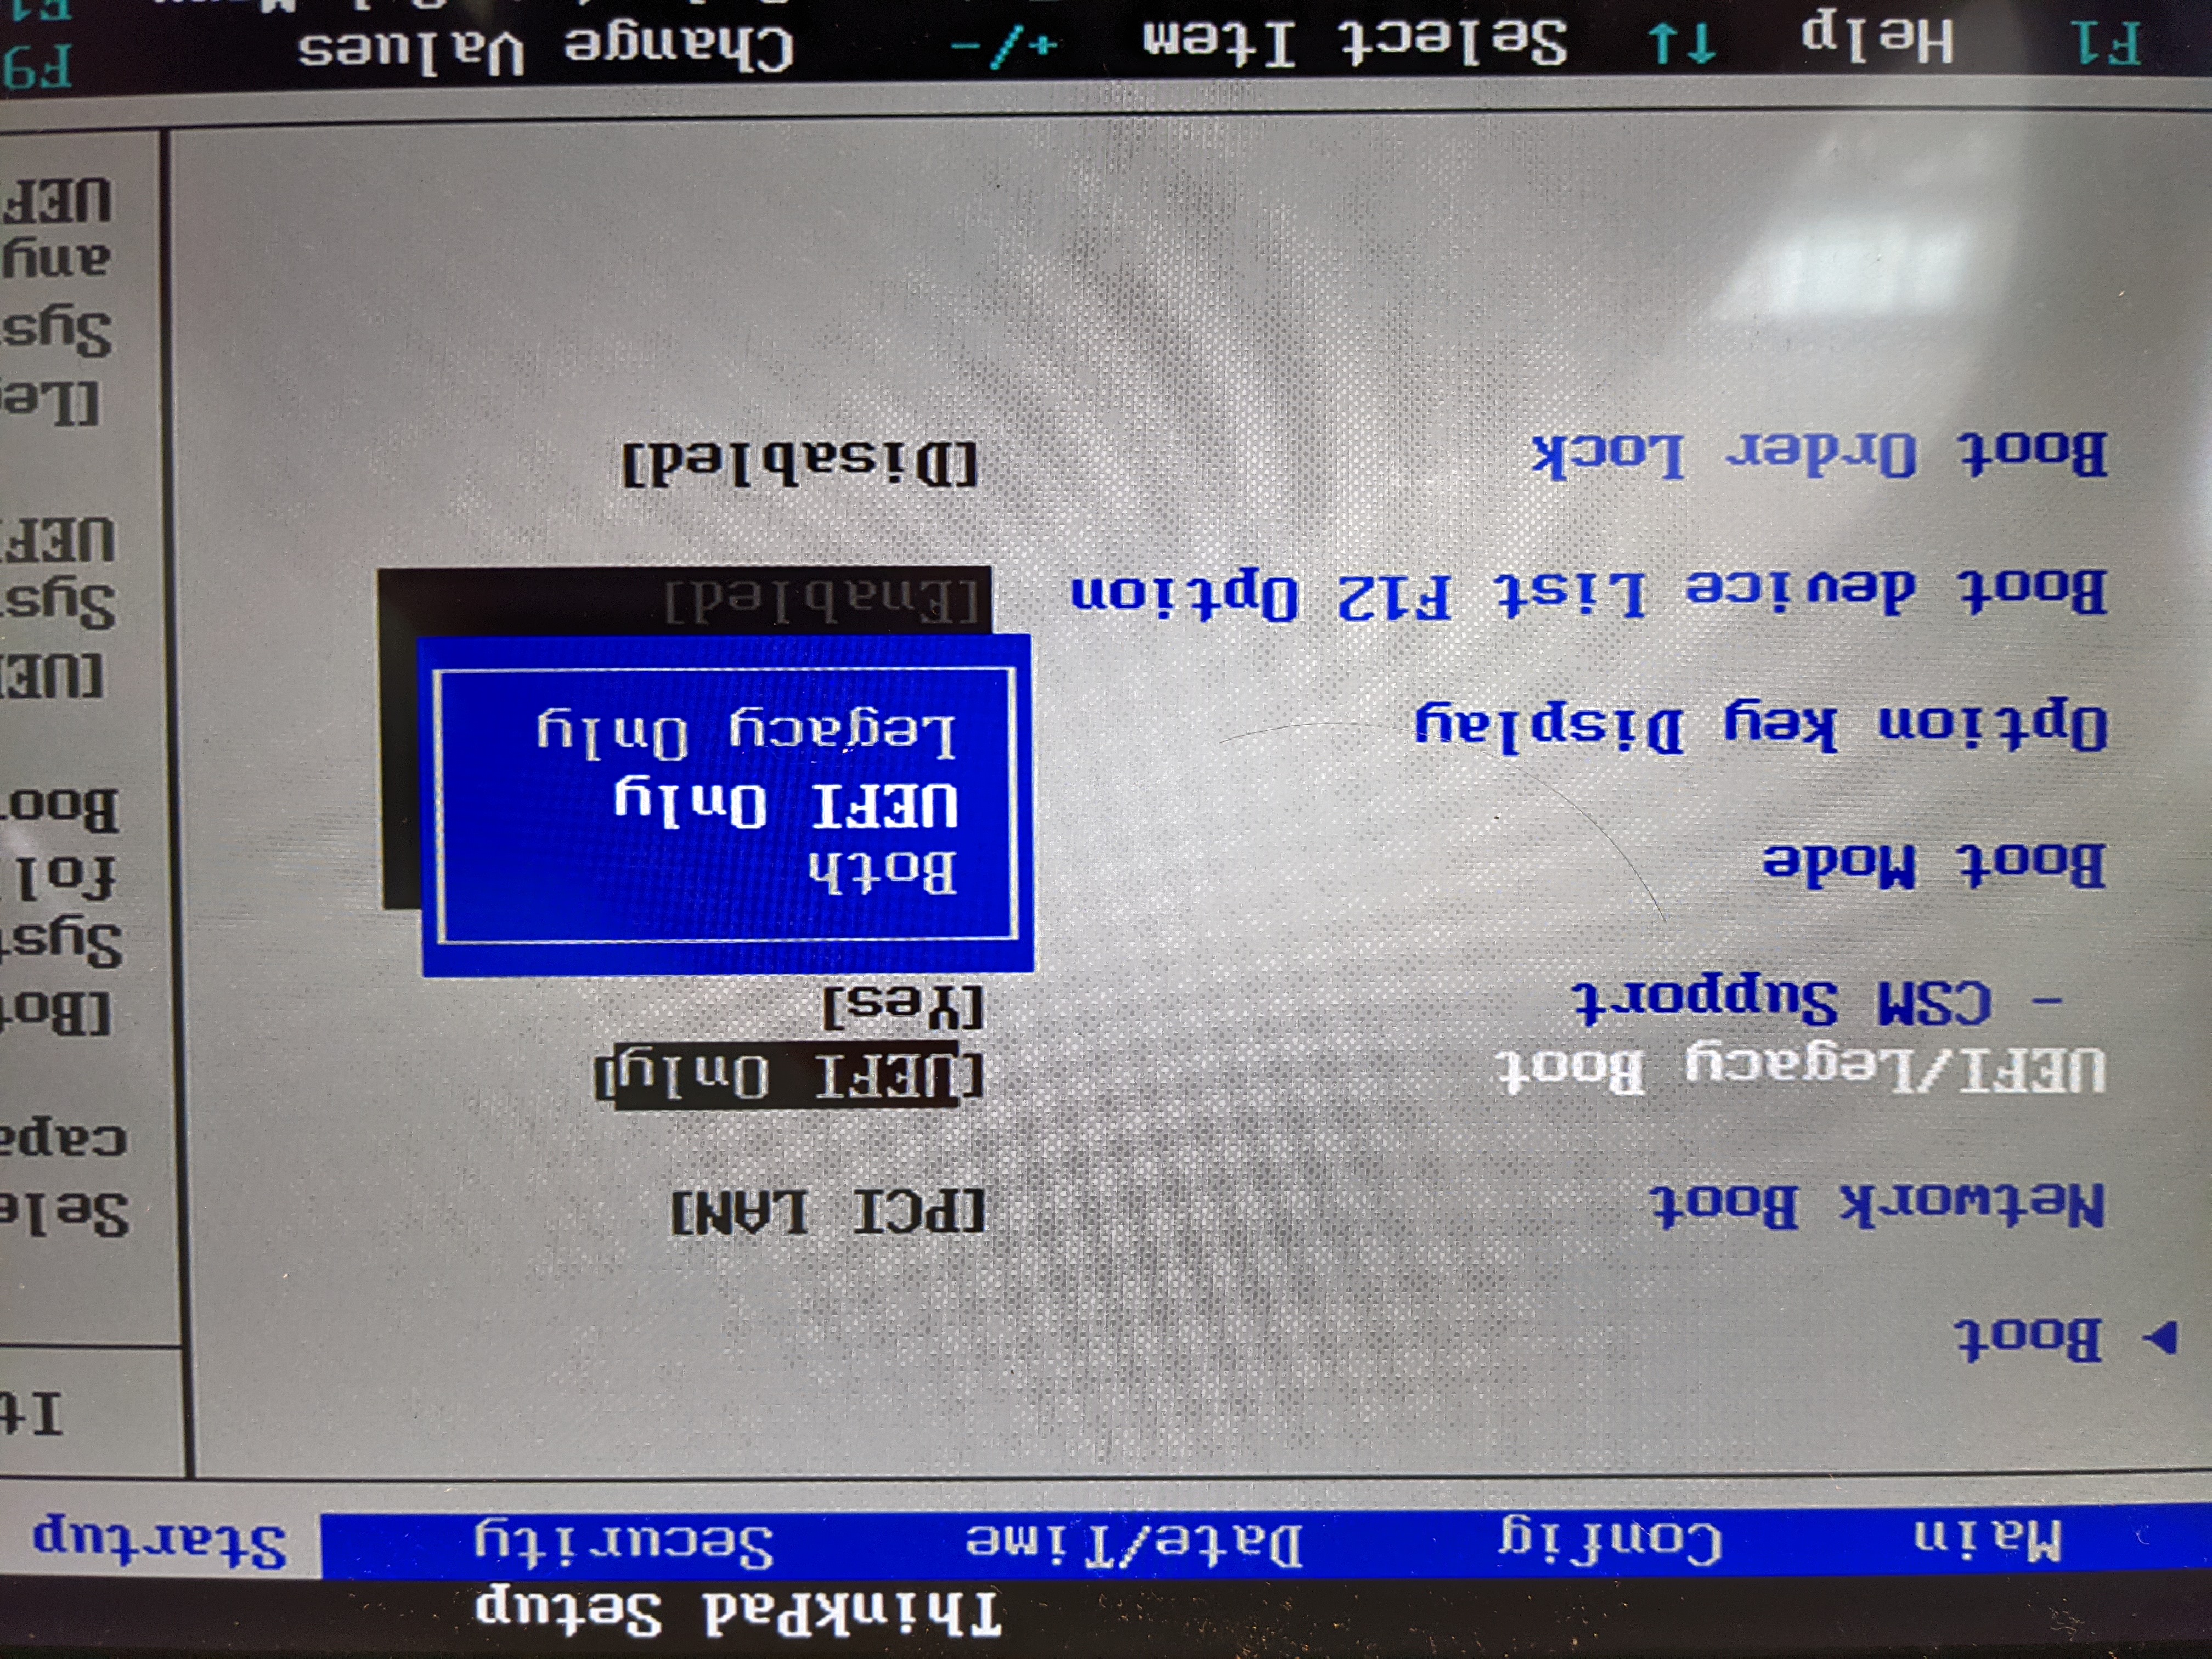
- Secure boot is disabled
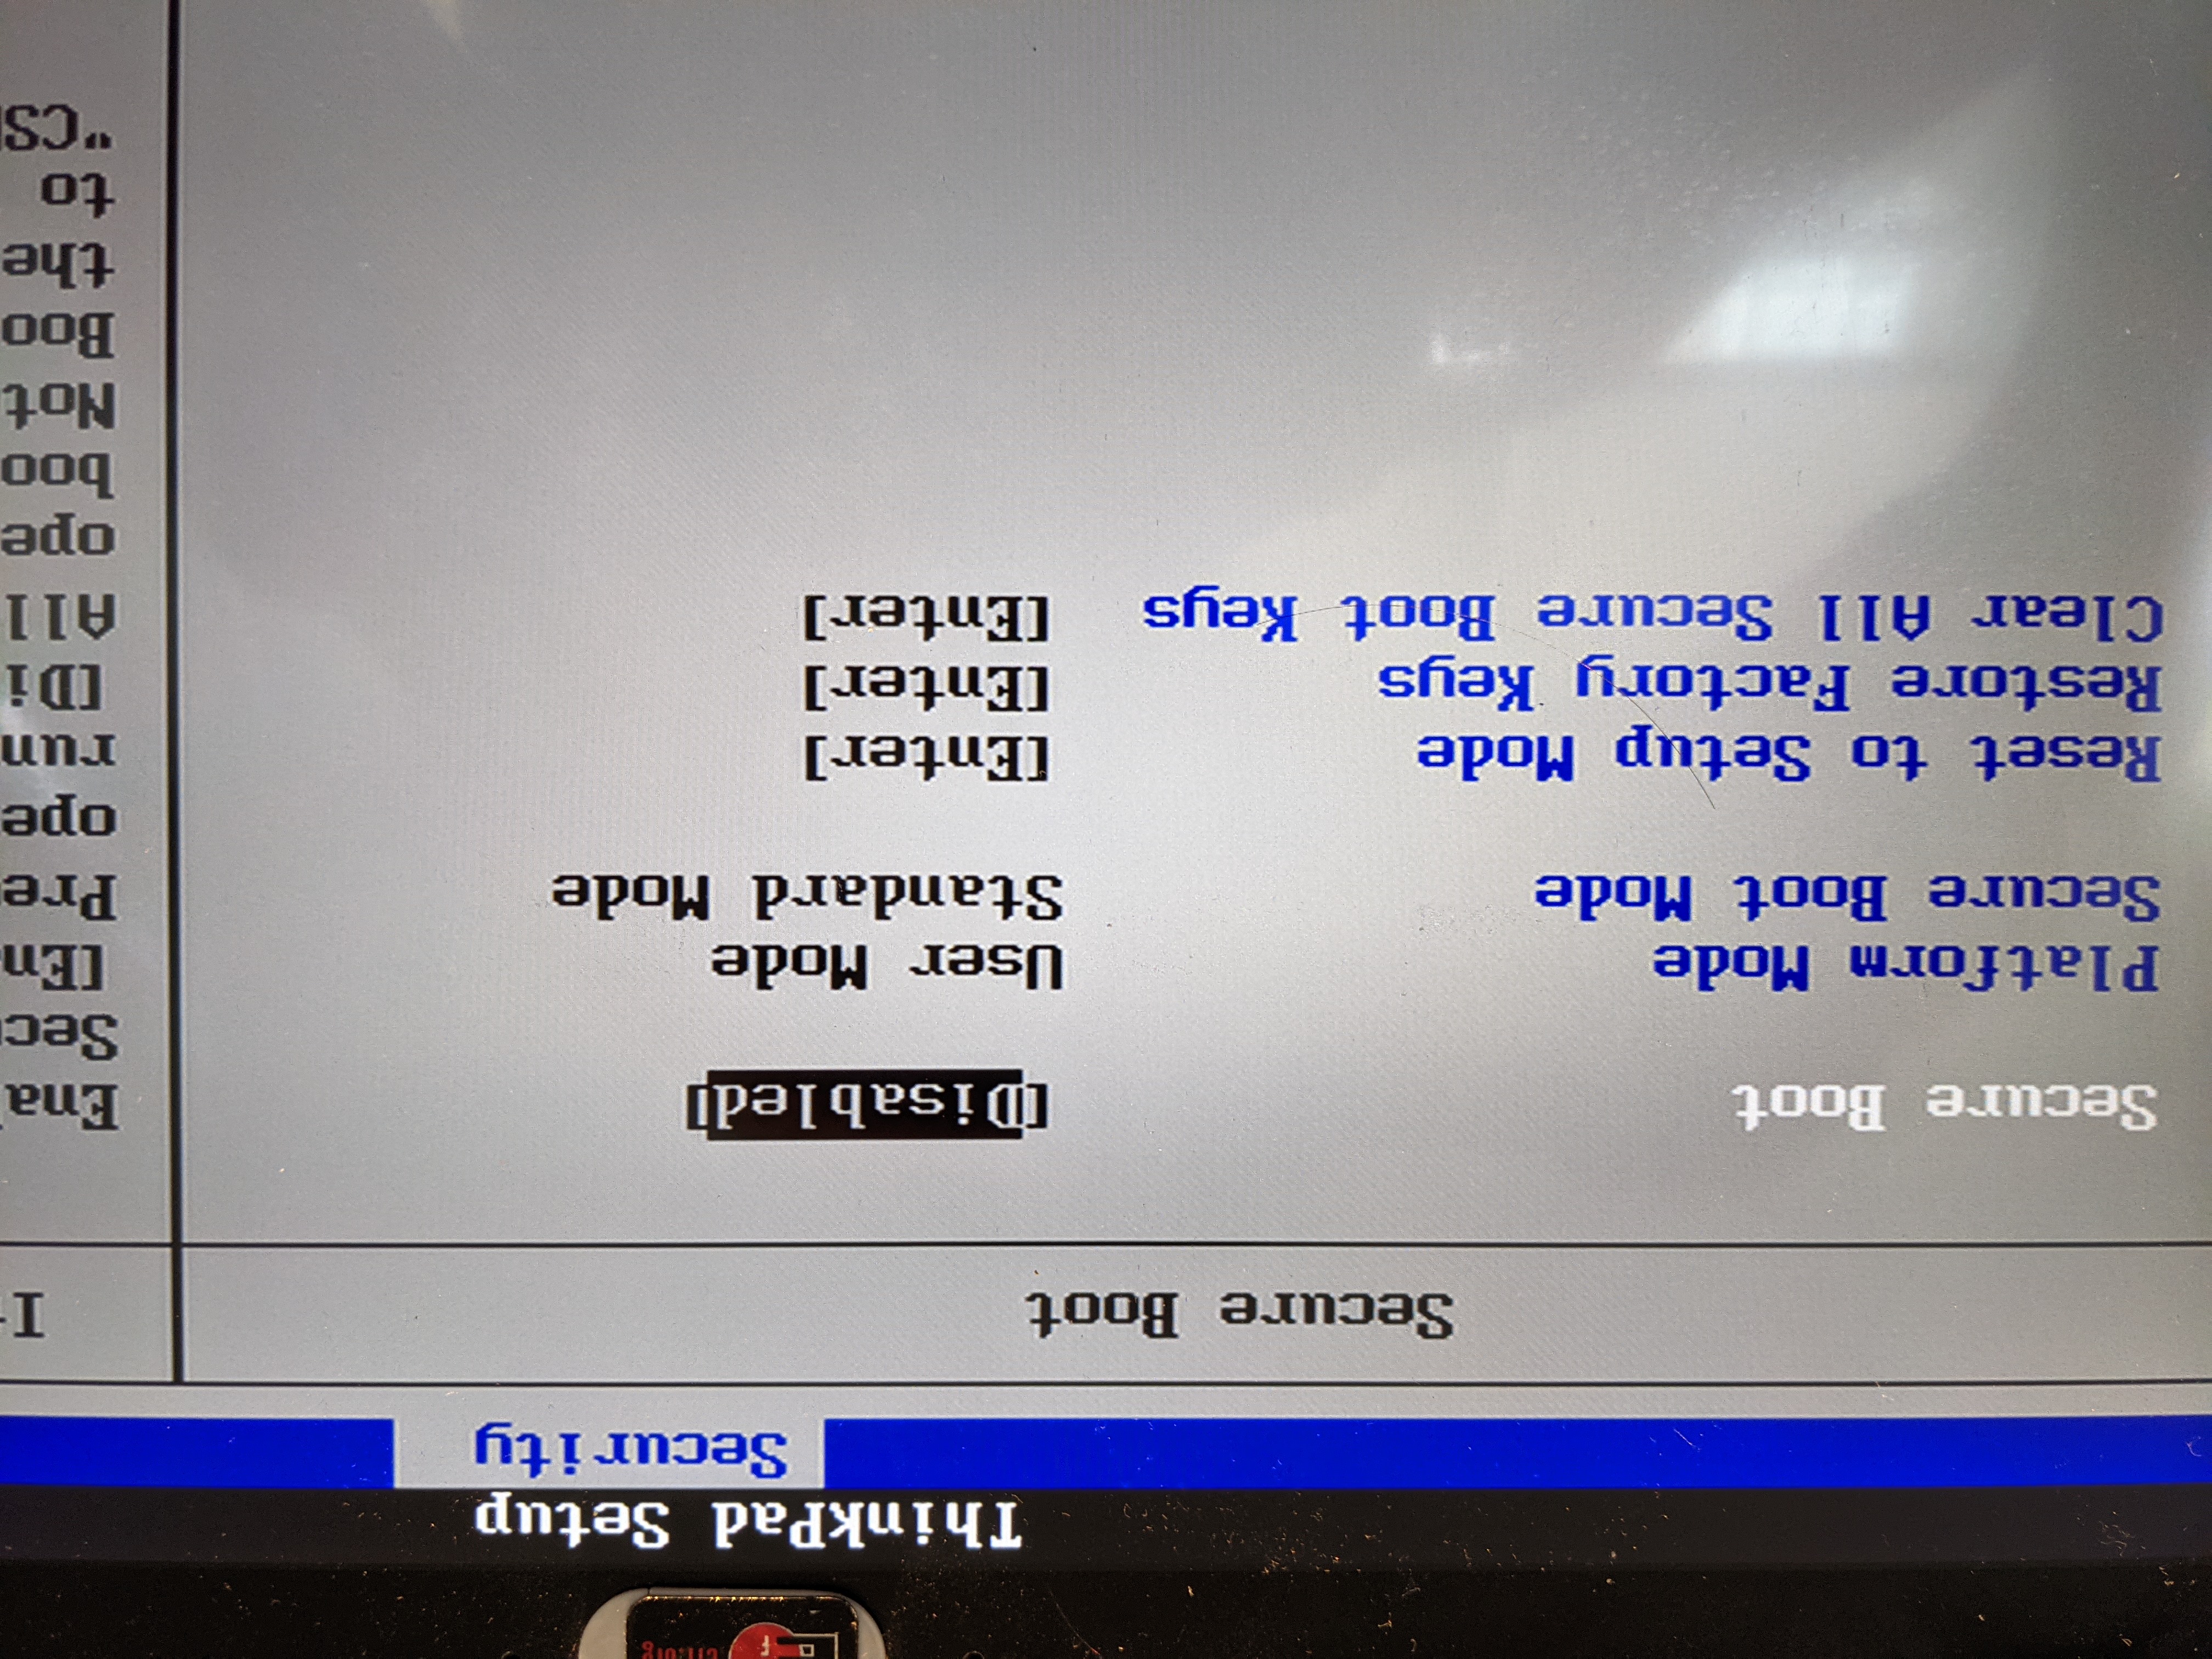
Why are we disabling Secure Boot?
The Arch Linux installation images do not support Secure Boot, although we can configure our system to use Secure Boot after installation, if desired.
Partitioning, formatting, and mounting Link to heading
This is how I’m partitioning my 500GB disk:
| Partition | Size | Usage | Format | Mount |
|---|---|---|---|---|
/dev/sda1 |
512M | ESP | vfat32 | /boot |
/dev/sda2 |
80GB | ROOT | ext4 | / |
/dev/sda3 |
16GB | SWAP | swap | |
/dev/sda4 |
396GB | HOME | ext4 | /home |
I recommend cfdisk for creating and editing partitions. It’s like fdisk, but with a curses interface, which is much easier to use.
If needed, we can format each partition on the file system like so:
mkfs.vfat -F 32 /dev/sda1
mkfs.ext4 /dev/sda2
mkswap /dev/sda3
mkfs.ext4 /dev/sda4
warning - formatting a partition will delete all of the data on it!
To boot into UEFI, I had to migrate my partitioning scheme from MBP to the newer GPT. You can check your partitioning scheme with gdisk.
Resizing partitions Link to heading
Sometimes we need to resize our partitions. This came up for me when I moved my partitioning scheme from MBR to GPT. Since GPT requires a small amount of space at the end of the disk, I had to shrink the last partition on my disk (/dev/sda4) to make space.
Although GPT only needs ~33 blocks, I gave it a couple GB’s just to be safe :)
resize2fs /dev/sda4 396GB
My /dev/sda4 partition originally extended to the end of the disk, and was ~400GB.
Be sure to run efsck -f <device> (eg: efsck -f /dev/sda4) after shrinking the file system, to ensure everything is ok.
After shrinking the file system, we can then shrink the partition using cfdisk.
Mounting partitions Link to heading
Now that our partitions are correctly formatted and sized, let’s mount them so that we can install Arch!
This is how I do it:
# mount root:
mount /dev/sda2 /mnt
# mount boot:
mount /dev/sda1 /mnt/boot
# mount home:
mount /dev/sda4 /mnt/home
# enable swap
swapon /dev/sda3
Installation Link to heading
Make sure that you’re connected to the internet for this part, since the installation process needs to retrieve packages from a remote repository. The live boot image that I used (2021.02.01) came with a neat tool iwctl which makes it pretty easy to connnect to a wifi network:
iwctl --passphrase <passphrase> station <device> connect <SSID>
Now we can run our installation script, which will add the kernel image into our /boot directory:
pacstrap /mnt base linux linux-firmware
Configuration Link to heading
We also have to configure our fstab. Unless we’ve added, removed, or reformatted any partitions, we won’t need to make any updates. But it’s always good to check. I usually do the following:
# concat the new fstab config into our fstab file:
genfstab -U /mnt >> /mnt/etc/fstab
# verify the it looks correct, comparing the new/old version:
vim /mnt/etc/fstab
This is how my fstab looks:
# Static information about the filesystems.
# See fstab(5) for details.

# <file system> <dir> <type> <options> <dump> <pass>

# /dev/sda2
UUID=12345678-1234-1234-1234-1234567890ab       /               ext4            rw,relatime     0 1

# /dev/sda1
UUID=1234-5678          /boot           vfat            rw,relatime,fmask=0022,dmask=0022,codepage=437,iocharset=ascii,shortname=mixed,utf8,errors=remount-ro   0 2

# /dev/sda4
UUID=22345678-1234-1234-1234-1234567890ab       /home           ext4            rw,relatime     0 2

# /dev/sda3
UUID=32345678-1234-1234-1234-1234567890ab       none            swap            defaults        0 0
Now that fstab is configured, we can chroot into the root:
arch-chroot /mnt
We should also check if there’s a initramfs-linux.img image located in the /boot directory. If not, we can regenerate it with: mkinitcpio -P.
We’ll also want to install intel microcode with pacman -Syu intel-ucode.
We should now have a intel-ucode.img file in our /boot directory.
Setting up the systemd-boot UEFI bootloader
Link to heading
While GRUB is great, it’s an old and bloated program. I’ve had trouble debugging GRUB in the past, so I switched to systemd-boot, which is a text only bootloader. It’s basically an interface for the boot logic included in EFI.
To install systemd-boot, first verify the system is configured to boot in UEFI mode (which we configured earlier in our BIOS setting):
ls /sys/firmware/efi/efivars
Now let’s install our systemd-boot bootloader:
bootctl install
We should now have a /boot/EFI and boot/loader directory.
Finally, to complete our bootloader config, we need to add our loader configuration, and a loader entry.
My loader configuration is saved under /boot/loader/loader.conf, and looks like this:
default  arch.conf
timeout  4
I only have one loader entry, although we can always add more for multiple OS’s. My loader entry is saved under /boot/loader/entries/arch.conf:
title   Arch Linux
linux   /vmlinuz-linux
initrd  /intel-ucode.img
initrd  /initramfs-linux.img
options root="LABEL=arch_os" rw
Note that the root option is referencing the root partition by it’s partition label. We can check the partition’s label like so:
e2label /dev/sda2
In my case, I set it to arch_os:
sudo e2label /dev/sda2 arch_os
Now we’re done! We should be ready to restart the system and have it boot successfully.
To recap, our /boot directory should look like this:
❯ tree /boot
/boot
├── EFI
│   ├── BOOT
│   │   └── BOOTX64.EFI
│   ├── Linux
│   └── systemd
│       └── systemd-bootx64.efi
├── initramfs-linux.img
├── intel-ucode.img
├── loader
│   ├── entries
│   │   └── arch.conf
│   ├── loader.conf
│   └── random-seed
└── vmlinuz-linux
References:
- On this podcast, James Munns and Bryan Cantrill have an interesting conversation about the tradeoffs of Linux vs Mac: https://jamesmunns.com/podcast/006-bryan/
- Asahi Linux: https://asahilinux.org/
- Arch Linux installation docs: https://wiki.archlinux.org/index.php/Installation_guide
- Arch Linux install with LUKS encryption: